Obtaining high-quality varietal planting material is one of the important aspects of apple cultivation. There are many different ways and methods of growing seedlings. We will help the gardener to understand this difficult issue, introduce the most productive and affordable options for propagating apple cuttings.
Cutting of an apple tree: is it possible to grow an apple from a cuttings
The answer to this common question is unequivocal - yes, it is possible. Moreover, this is practically the only way of propagation of the apple tree. True, there is still the opportunity to grow it from a seed, but this is a rather painstaking method, requiring significant time costs. Under him varietal features are not preserved and he did not find wide distribution. The main purpose of cuttings is to obtain seedlings for propagation.
There are two methods for obtaining apple tree seedlings from the cuttings - grafting on a stock (the so-called plant to which a bud or a stalk of another plant is grown) and rooting the stalk without grafting. We will reveal in detail the essence of the second method.
Duration of propagation by rooting cuttings
All methods of obtaining seedlings from cuttings by rooting without grafting require a ready-made plant by autumn. Depending on the method, the process can begin at the end of winter or spring. More specific dates will be indicated below when describing rooting methods.
Propagation of apple trees by rooting cuttings
This method is used in two main cases:
- For growing stocks in order to further obtain seedlings by vaccination.
- For rooting seedlings.
The method consists of the following steps:
- Harvesting cuttings.
- Storage of them (if necessary).
- Rooting.
- Landing.
Propagation of apple trees with lignified cuttings
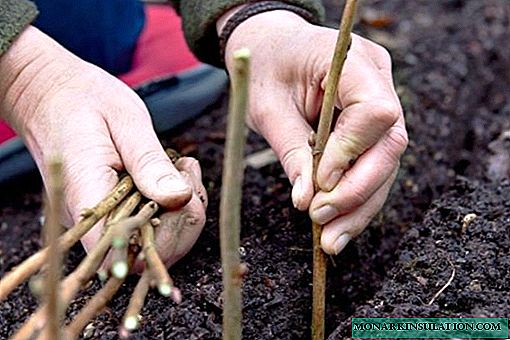
Lignified cuttings usually root in the spring, and harvested in late December - early January. To do this, choose one- or two-year-old lignified shoots located in the middle of the crown from the south or southeast side of the tree. They must be absolutely healthy, without signs of illness and damage. Two options are possible:
A method for stimulating concentration processes in future cuttings of hormonal growth substances
It has a high percentage of survival - according to various sources, it is not less than 70%. The method is as follows:
- Twigs break without damage to the bark or with partial damage. Long branches can be broken in several places with an interval of 15-20 cm.
- The places of breaks should be fixed by applying a bandage from a patch, electrical tape or other suitable material. In this form, the cuttings are left until spring, while growth substances will be sent to the injured places to heal the fractures.
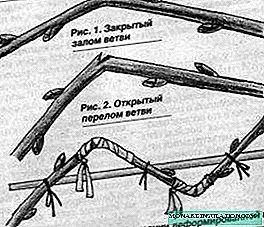
The break points should be fixed by applying a bandage from a patch, tape, or other suitable material.
- In March - April, the bandage is removed and cuttings are cut into places of breaks. In this case, the lower section should be straight and located 1-2 cm below the kidney, and the upper one should be oblique and 0.5-1 cm above the kidney. The direction of the upper cut is from the kidney down.
- For rooting, place the cuttings in opaque containers (two-liter bottles of dark plastic with a cut neck are well suited - they are cut so that the upper ends of the cuttings are slightly higher than the edge of the bottle), on the bottom of which they put a porous sponge 1-1.5 cm thick and pour melt or rain water to a level of 5-7 cm. Two tablets of activated carbon are added to the water. Tanks with cuttings are placed on the windowsill.

For rooting, place the cuttings in opaque containers (two-liter bottles of dark plastic with a cut neck are well suited), on the bottom of which they put a porous sponge 1-1.5 cm thick and pour melt or rain water to a level of 5-7 cm
- Then observe the rooting process. After about a week, callus (callus) thickenings form on the lower ends of the cuttings, then roots begin to appear. When their size reaches 5-7 cm (usually it takes another two weeks), then the cuttings are planted in the ground.
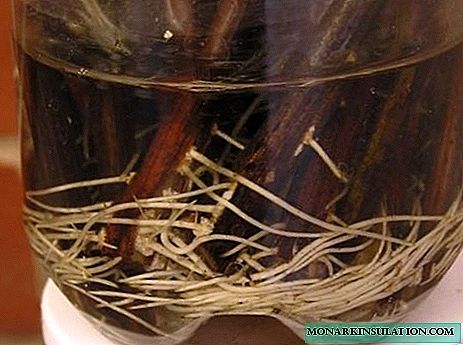
When the size of the roots reaches 5-7 cm (usually it takes two weeks), the cuttings are planted in the ground
- The landing site should be well-lit, but without direct sunlight. In hot weather, you may need to shade future seedlings. At first, before good rooting (for about 2-3 weeks), you need to make an impromptu greenhouse over the cuttings from improvised materials (glass, transparent plastic or film) to create a greenhouse effect.
- During the season, you need to periodically water the plants, preventing the soil from drying out.
- By autumn, full-grown seedlings grow from cuttings, which can be planted in a permanent place.


Callus in plant biology refers to cells that form on the wound surface of a plant. Callus tissue, as a result of the division of cells bordering on the wound, forms cork sites - as a result, wounds heal, vaccinations grow together, etc.
Rooting of lignified cuttings at home
Of the selected — as described above — twigs are cut into 10-15 cm long with two to three internodes and placed for storage in a container with wet sand (the cuttings should be completely covered). Air temperature should not exceed +2 ° C. They begin to root in late February - early March. For this:
- Suitable containers (boxes, containers, pots, etc.) are prepared that are filled with nutrient soil to a depth of 15-20 cm. Such soil should be prepared in the fall by mixing chernozem, peat, humus and river sand, taken in equal proportions. And you can also use any purchased soil with a neutral acid-base reaction (pH 6.5-7.0).
- Pull out the cuttings and refresh their cuts.
- The upper sections are covered with garden var.
- The lower ends of the cuttings are lowered for several hours into the solution of the root (Heteroauxin, Kornevin, Zircon, etc.).
- Cuttings are planted in the soil to a depth of 5-7 cm (there should be no kidneys on a segment below the soil level, and if they are, then they must first be removed) with an interval of 5-10 cm.
Cuttings are planted in the soil to a depth of 5-7 cm with an interval of 5-10 cm
- They moisturize the soil well and in the future make sure that it does not dry out. Waterlogging and acidification is also not allowed.
- Create a greenhouse effect in containers by building an impromptu miniature greenhouse. Keep them indoors at room temperature.
- In late March - early April, containers with already rooted cuttings are taken out to the garden or transplanted into open ground to the school.
- Until the fall, they provide plants with the usual care - watering, loosening, mulching, shading.

The described method can be improved in an interesting way. Before placing the cuttings in a box with nutrient soil, its lower end is inserted into ordinary raw potato (all eyes are previously removed from it). Then the lower part of the cuttings, along with potatoes, is buried in the soil. Further actions remain the same. According to some evidence, this technique increases the rooting of cuttings and they form better roots.
Advantages and disadvantages of apple propagation methods by rooting of lignified cuttings
The following features of the method can be attributed to advantages:
- Preservation of varietal characteristics of the donor. Cuttings can be taken from both root and grafted apple trees.
- The ability to breed apple trees at any age.
- Cuttings are easy to save, they can be sent to any distance without any special costs (as opposed to transporting finished seedlings).
The only drawback of the method compared to propagation by root cuttings is the longer term for rooting and obtaining a finished seedling.
Propagation of apple trees with green cuttings
This method does not provide a high level of survival - according to various sources, it ranges from 30 to 60%. But since green cuttings can be prepared in fairly large quantities, and completely free of charge, you can always get the right amount of seedlings as a result. Another advantage of the method is the preservation of varietal characteristics of the donor. The disadvantages include a somewhat troublesome care and a longer period for receiving the finished seedling - it is two years. Due to these shortcomings, the method is rarely used in practice. For those who want to try it out, we describe in detail. The procedure should be started from the beginning of May until the end of July, but the sooner the better.
The technique is as follows:
- Right before planting, preferably in the early morning, green branches of the current growth are cut.
- One or several cuttings can be cut from each branch, depending on its length. Each of them should have three kidneys. In doing so, observe the following rules:
- The bottom cut is done directly under the kidney, and the bottom sheet is removed.
- The upper section is made 0.5-1 cm above the kidney.
- In order to reduce moisture evaporation, the remaining two sheets are shortened by half.
- A layer of nutrient soil with a thickness of 5-7 cm is poured into a low box, and above it - wet sand with a layer of 4-5 cm.
- Harvested cuttings are stuck in the sand to a depth of 1-2 cm. The distance between the cuttings is maintained within 4-5 cm.

Green cuttings are stuck into the soil to a depth of 1-2 cm with an interval of 4-5 cm
- A small greenhouse of arcs and film is installed above the box to create an optimal humidity mode.
- A greenhouse with a box is placed in partial shade.
- Periodically with an interval of 3-4 days, the greenhouse briefly (for 5-10 minutes) open and moisten the sand from the spray.
- After rooting the cuttings (as a rule, this occurs after 2-3 weeks) the greenhouse is removed.
- Until autumn, they make sure that the soil is always moist, periodically loosen it and mulch it.
- In autumn, young seedlings are either planted in a permanent place (with obligatory shelter from frost), or transplanted into containers with nutritious soil and placed in the unheated greenhouse for the winter.

Video: how to root green cuttings correctly
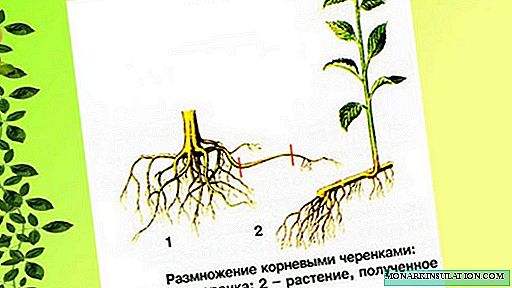
Growing apple seedlings from root cuttings
Root cuttings can propagate an apple tree of any variety. All that matters is that it be root. If we take the cuttings from a grafted apple tree, then as a result we get a non-varietal seedling, which can only be used as a stock for grafting a cultivar on it. The second condition for obtaining a positive result is that the donor apple tree must be young (no older than 5-7 years), as its ability to form root shoots decreases sharply with age. Cuttings are harvested in autumn by cutting parts of the roots with a diameter of 5-10 mm and a length of 10-15 cm, without forgetting to mark their ends that were closer to the trunk. Until spring, cuttings are stored under a layer of sand in the cellar at a temperature not exceeding +5 ° C. You can also dig the cuttings in the garden. To do this, dig a small groove in an unsinkable place, on the bottom of which a layer of sawdust is poured. Stacked cuttings from above are also covered with sawdust and sprinkled with earth. If the winters in the region are cold and not very snowy, then the place of digging is additionally insulated with improvised materials - spruce branches, dry leaves, sawdust, etc. It would be useful to put poisonous baits for mice in the storage place.
They begin planting in early spring with the onset of swelling of the kidneys. The technology is as follows:
- 10-15 days before the expected date of planting, cuttings are placed obliquely in a box with sawdust so that the part that is closer to the trunk is covered, and the second part is directed upward and slightly protrudes above the sawdust.
- Sawdust moisturizes well and put the box in a warm room (+ 20-25 ° C).
- After some time, buds form on the cuttings, after which the growth of the shoot begins. When the rudiments of shoots have reached 1 cm, they are planted in the ground. This usually occurs in 2-3 weeks.
- Cuttings are planted obliquely or vertically into grooves with an interval of 5-6 cm to such a depth that they protrude from the ground by 1.5-2 cm.
- The groove is watered and mulched.
- After the emergence of seedlings, they are looked after as well as ordinary seedlings (watered, loosened, weed, shade, etc.).
Some time after planting root cuttings shoots appear

The main advantage of the method is a shorter time to obtain a seedling than when rooting a lignified (and even more so green) cuttings. But even faster (and with the same quality result), you can get a seedling by using a root shoot (shoot) as its seedling. The disadvantages of the method:
- Inability to propagate grafted trees.
- Inability to reproduce old trees.
Growing seedlings from root layers
In the spring, around the stem, soil is poured with a layer of 20 cm and constantly watered during the season. The following year, roots with sprigs of overgrown branches grow from the sprinkled portion of the stem, which are cut off and used for propagation. Of course, this method is applicable only to root apples.

The next year, after the powder is sprinkled with the stem, roots with branches of overgrowth grow from it, which are cut off and used for propagation.
Video: getting apple seedlings from root branches
Rooting cuttings on a tree (aerial layering)
Quite an interesting method of growing roots directly on a tree. For the purposes of this method, in May - June, the strongest branches with good growth are selected. Then they do this:
- A young shoot of the current year is found and below the place where it began to grow on last year’s lignified part, the bark is removed with a 1-3 cm wide ring.
- The cut-off site of the bark is moistened with a Kornevin solution, which will contribute to faster root formation.
- At a distance of 10-15 cm above the incision, all kidneys are blinded and several incisions of the cortex are made.
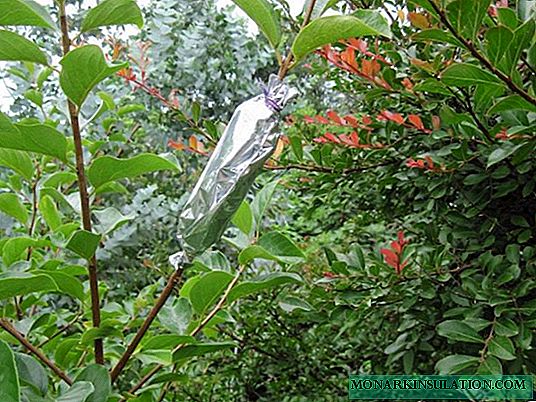
- A narrow polyethylene sleeve is put on a branch - a bag with a cut bottom - 10-15 cm in diameter. Its lower end is secured with electrical tape 7-10 cm below the annular cut. After that, the bag is filled to the height of blinded buds with raw, overcooked sawdust or moist moss and add a little humus . Moisten the substrate by adding about 200-300 ml of water - melt or rain - and fix the upper end of the package with electrical tape. Instead of a bag (or with it), you can use a cut plastic bottle of a suitable size.

The design for rooting air layers is made from improvised materials
- Then, the resulting structure is wrapped in several layers of newspapers or white paper to reflect sunlight. It is also possible to use aluminum foil for this.
- By autumn, roots should form inside the bag. If this happened, then the upper part of the branch with roots is cut off and planted for the winter in a trench, which is well insulated.
- In spring, the seedling is planted in a permanent place.

This ancient method, although not widely used, has practically no drawbacks and can be recommended for use.
Video: rooting aerial branches of apple trees
Reproduction of the apple tree by rooting cuttings only at first glance seems difficult. Having carefully studied the instructions for obtaining seedlings from lignified, green or root cuttings, the gardener will find for himself the most suitable method for a specific situation.