I decided to start the work on refining the newly purchased plot with the layout and arrangement of garden paths. In my arms I already had a project created by a landscape designer. On the plan, in addition to buildings and plants, curved paths leading to all the "strategic" objects of the site were designated. Concrete paving stones were chosen as paving - the material is durable and, at the same time, capable of creating a decorative surface.
I started to build tracks on my own, because I have a strong belief that construction crews, even professional ones, often do not prepare a “pillow” for paving stones with sufficient quality. Then the tile bends over, falls out ... I decided to do everything myself, so that I would definitely observe all the paving rules. Now that my tracks are ready, I decided to share my building experience by providing a detailed photo report.
Pavers have a complex, multi-layer structure. I decided to use a sequence of layers (bottom-up):
- priming;
- geotextiles;
- coarse sand 10 cm;
- geotextiles;
- geogrid;
- crushed stone 10 cm;
- geotextiles;
- granite screening 5 cm;
- concrete paving stones.
Thus, in my pie, 3 layers of geotextile are used - to separate layers of crushed stone and sand. Instead of paving under the cobblestones, I applied a fine granite screening (0-5 mm).
I will try to state in stages the technology that I used when creating tracks.
Stage 1. Marking and excavation under the track
My tracks are curved, so using a normal rope and pegs, as recommended in the literature for marking, is problematic. The way out was simple. For the formation you need to use something flexible, for me a rubber hose turned out to be a suitable marking material. With it, I formed the outline of one side of the track.
After that I applied an even rail to the hose and marked the second side of the track with a shovel. Then he “gnawed” pieces of turf with cubes on a shovel on both sides of the path, they served as a guideline for further excavation of the trench.

Cutting turf along the contours of the tracks
It took several days to dig the trench, at the same time I had to uproot 2 stumps and a bush of currant, which, in their misfortune, were on the path of the future path. The depth of the trench was about 35 cm. Since my site is not perfectly even, an optical level was used to maintain the level of the trench.

Dug trench
Stage 2. Laying geotextiles and filling sand
At the bottom and walls of the trench I laid Dupont geotextiles. The technology is this: a piece is cut from the roll along the width of the track and laid in the trench. Then the edges of the material will be cut off and covered with earth.
Geotextiles have a very significant function. It protects the layers of the road cake from mixing. In this case, geotextiles will not allow sand (with which it will be filled) to be washed out into the ground.
Sand (large, quarry) was covered with a layer of 10 cm.

The process of filling sand onto a laid geotextile layer
To ensure the horizontal level of the layer, before backfilling across the trench, I put a few slats to a height of 10 cm in increments of about 2 m. I got peculiar beacons at the level of which I filled the sand.
Since it was necessary to pull out the sand embankments and align them along the rails with something, I invented a device that plays the role of a building rule, but on a handle. In general, I took a hoe, fastened the rail to it with two self-tapping screws, and got a universal equalizer for loose layers. Leveled.
But aligning is not enough, at the end the layer should be as compacted as possible, tamped. For this work, I had to buy a tool - an electric vibrating plate TSS-VP90E. At first, I tried to tamp the sand layer that was not yet aligned, as I thought that the slab was heavy and flat - it would even everything out. But it turned out not so. The vibrating plate constantly strove to stall in the ups and downs of the sand, it had to be set aside, pushed back. But when the sand was leveled by my modified hoe, the work went easier. Without encountering obstacles, the vibrating plate moves easily, like clockwork.

Sand compactor with electric vibrating plate
With a vibrating plate, I walked along the sand layer several times, after each passage I spilled the surface with water. The sand became so dense that when I walked along it there were practically no traces.

When tamping, sand must be shed several times with water so that it compacts as much as possible
Stage 3. Laying of geotextiles, geogrids and installation of a border
On the sand, I laid the second layer of geotextiles.

Geotextiles will not allow sand to mix with the subsequent layer of crushed stone
Next, according to the plan, there is a geogrid, on top of which a border is installed. It seems that everything is simple. But there is a snag. Curb stones (height 20 cm, length 50 cm) are straight, and the paths are curved. It turns out that the borders repeat the lines of the tracks, it is necessary to cut them at an angle, and then dock with each other. I sawed and trimmed the ends on an inexpensive stone-cutting machine, having previously measured the angles, I drank it with an electronic goniometer.
All trimmed borders were put in line along the edges of the tracks, the docking is almost perfect. It turned out that the main part of the stones was cut into 20-30 cm pieces, especially sharp turns were collected from 10 cm pieces. The gaps between the stones during the final assembly were 1-2 mm.

Fitting curb stones to the curvature of the tracks
Now, under the exposed borders, it is necessary to lay the geogrid. In order not to engage in docking and re-setting borders again, I outlined their location with paint spray. Then he removed the stones.

The location of the stones is indicated by paint
I cut out pieces of the geogrid and laid them at the bottom of the trench. I have a Tensar Triax grid with triangular cells. Such cells are good in that they are stable in all directions, withstand the forces exerted along, across and diagonally. If the tracks are straight, then there is no problem, you can use ordinary grids with square cells. They are stable in length and across, and stretch diagonally. To me, with my tracks, these do not fit.
On top of the geogrid, I put the curb stones in place.

Laying geogrids and setting curbs
It remains to put them on the solution to fix the position. This process turned out to be difficult, since it is necessary to maintain the elevation levels previously set on the site plan. Traditionally, to comply with the level, it is recommended to use a cord (thread). But this is only suitable for straight tracks. With curved lines it is more difficult, here you have to apply the construction level, as a rule, the level and constantly check the levels of the project.
The solution is the most common - sand, cement, water. The mortar is applied with the trowel to the right place, then a curb stone is placed on it, the altitude is checked by the level. So I put all the stones on two sides of the tracks.

Fastening of curbs on cement mortar M100
Another important clarification: every day after work, you must necessarily wash the adhering solution with the wet brush from the sides and top of the stones. Otherwise, it will dry out and it will be more difficult to remove it, it will spoil the entire appearance of the tracks.
Stage 4. Filling of crushed stone and laying of geotextiles
The next layer is crushed stone 10 cm. I note that gravel is not used for the construction of paths. It is rounded in shape, so it does not "work" as a single layer. The crushed granite that was used for my paths is a completely different matter. It has sharp edges that mesh together. For the same reason, gravel gravel is suitable for the tracks (that is, the same gravel, but crushed, with torn edges).
Crushed stone fraction 5-20 mm. If you use a larger fraction, then you can not put the second layer of geotextiles, but do with one geogrid. It will prevent mixing of sand with crushed stone. But in my case there is just such a fraction, and geotextiles are already laid.
So, I spread the rubble with a wheelbarrow evenly along all the tracks, and then - I leveled it with a modified hoe. Since borders have already been installed at this stage, I redid the leveling rail for the hoe - I cut grooves at the ends that can be used to rest against the borders. The grooves must be such that the bottom of the rail falls at the planned level of backfill. Then, moving the rail along the backfill, it is possible to stretch the layer, level it to the desired level.

Alignment of a layer of crushed stone with a groove rail with cut out grooves
Tamped layer vibrating plate.
On top of rubble - geotextiles. This is already its 3rd layer, necessary to prevent mixing of the next layer (screening) with crushed stone.

Laying the third layer of geotextiles
Stage 5. The organization of the leveling layer under the paving stones
Most often, paving slabs are laid on a pavement - a poor cement mixture, or on coarse sand. I decided to apply for these purposes a granite screening of a fraction of 0-5 mm.
I bought screenings, fell asleep - everything, as with the previous layers. The bulk dropout thickness is 8 cm. After laying the paving stones and tamping, the layer will become smaller - its planned final thickness is 5 cm. The data that after tamping the dropout will settle by 3 cm are obtained experimentally. Another leveling layer, such as sand, can give a completely different shrink. Therefore, before starting paving, it is advisable to conduct an experiment: lay out the paving stones in a small section of the path, tamp it and see how long the dumping will take.
It is necessary to approach the leveling of the bed very carefully, using the leveling rail with grooves for the planned layer height.

Backfill and leveling with a wooden rail
Stage 6. Laying pavers
The height of the acquired pavers is 8 cm. According to the plan, it should be laid flush with the curb. You need to start laying from the central part of the track, closer to the curbs, trimming begins. With a complex pattern of paving, you have to cut a lot. I sawed the cobblestones again on the machine, got tired - a lot of time and effort wasted. But it turned out beautifully!
The technology of laying pavers is quite simple. In fact, you just need to drive the tile into the dumping with blows of a mallet. At the same time, the dumping is rammed, and the paving stones are fixed. The level of the floor is controlled by a stretched cord or thread.

Start laying pavers - from the central part of the tracks

The drawing of the track is already visible, it remains to saw and install paving stones near the curbs
I rammed the paving stones with a vibrating plate, I did not use the rubber gasket - I do not have it.

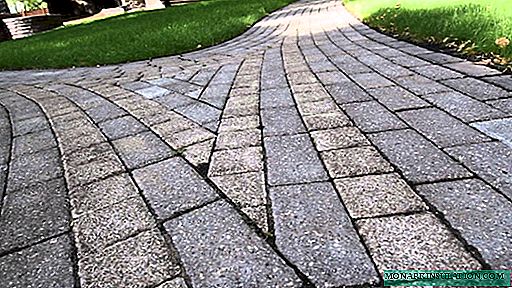
Here is a path turned out!
As a result, I have a reliable beautiful track, almost always dry and non-slip.
Evgeny